Quickstart#
Generate Datasets#
To generate microphone array data with one of the available dataset generation methods, the user needs to import and instantiate the respective class and call the method generate() with the desired parameters. The generate() method returns a Python generator, which can be used to extract the desired features.
The following code snippet shows how to create a dataset generator:
In [1]: from acoupipe.datasets.synthetic import DatasetSynthetic

In [2]: # instantiate dataset class
   ...: dataset = DatasetSynthetic()
   ...:

In [3]: # create data generator for frequency 2000 Hz (single frequency)
   ...: data_generator = dataset.generate(
   ...:     size=10, split='training', features=['sourcemap','loc', 'f'], f=[2000], num=0)
   ...:
The user has to specify the size of the dataset, the dataset split split and the features to be extracted. A full list of available features can be found in the Features section. Optionally, the user can specify certain frequencies f and the desired bandwidth num. If no frequencies are given, the features will be extracted for all frequencies in the range \([0, fs/2]\) Hz.
Dataset Splits
All datasets comprise the following independent splits:
trainingdatasetvalidationdatasettestdataset
The size of each split can be freely chosen.
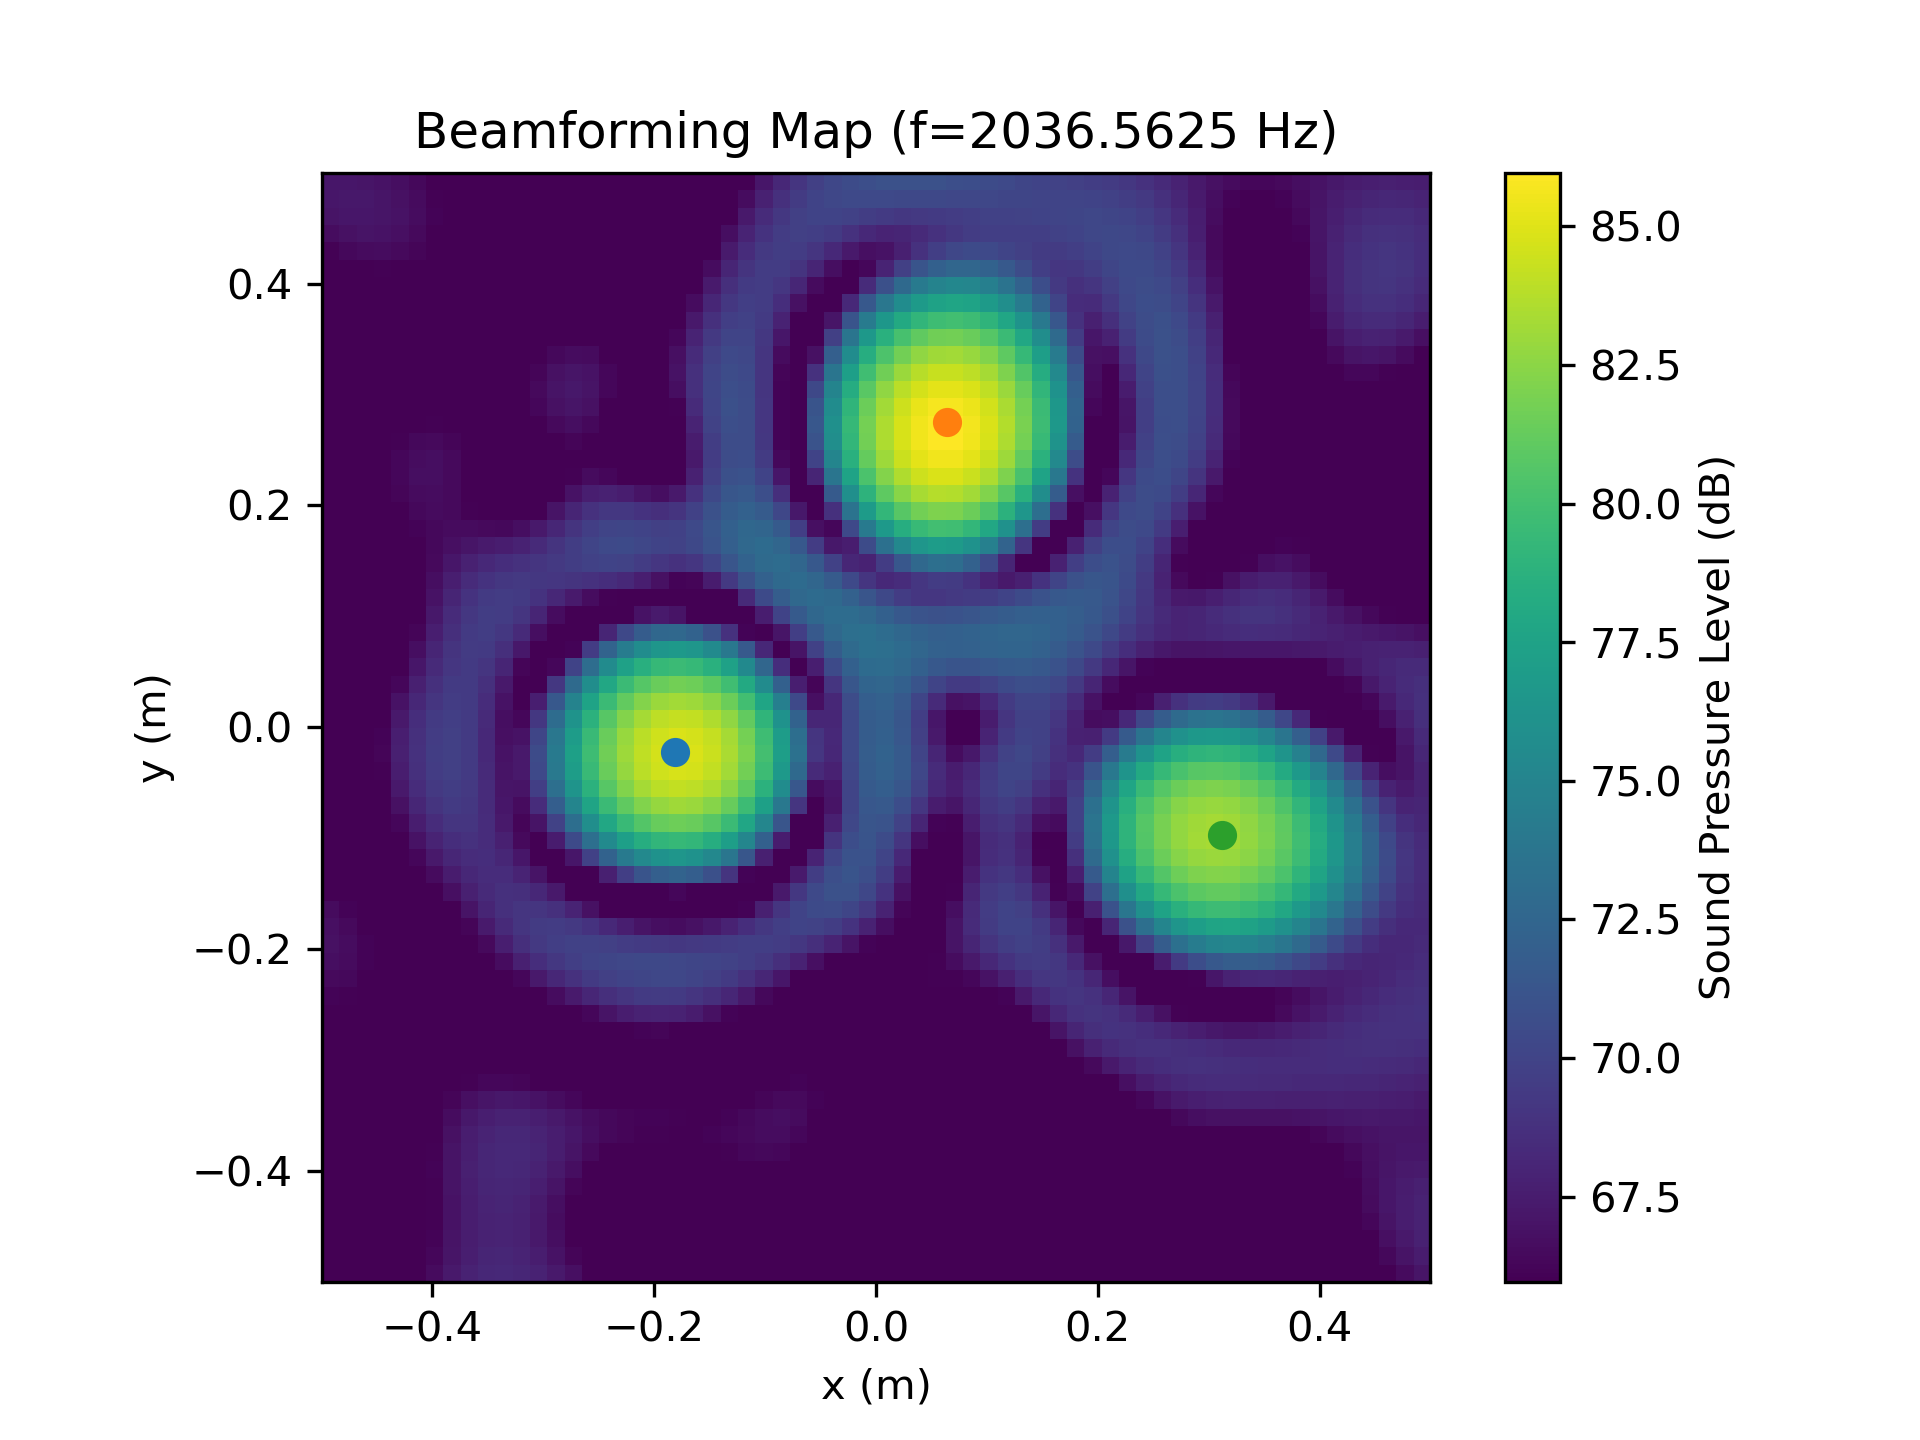
In this example, we choose the sourcemap feature, which is a 2D beamforming map with the squared sound pressure amplitudes at a reference position as values. Furthermore, we include the source locations loc and frequencies f as potential labels of the dataset.
There are a few things to note when extracting features with the data generator:
In [4]: data_sample = next(data_generator)
First, the data generator returns a single sample at a time, consisting of a dictionary with the feature names as keys and the corresponding data as values. Second, the data_sample dictionary includes two additional items, namely the idx and seeds of the sample. The idx is the sample index and the seeds are the random seeds used to generate the sample. Both are included for reproducible data generation, especially in multi-processing scenarios where the sample order may not be maintained.
Note
The frequency included in the data might be slightly different from the specified frequency. This is usually indicated by a warning and is due to the fact that the frequency is chosen from a discrete set of frequencies, which depends on the parameters of the FFT and the sampling rate fs of the dataset.
The sampling rate and the FFT parameters can be adjusted the following way:
In [5]: fs = 44100
   ...: block_size = 4096
   ...: dataset = DatasetSynthetic(fs=fs)
   ...: dataset.config.fft_params['block_size'] = block_size
   ...:
Now, the data can be plotted, e.g. by using the matplotlib library:
In [6]: import acoular as ac
   ...: import matplotlib.pyplot as plt
   ...: import numpy as np
   ...:

In [7]: extent = dataset.config.grid.extent

In [8]: # sound pressure level
   ...: Lm = ac.L_p(data_sample['sourcemap']).T
   ...: Lm_max = Lm.max()
   ...: Lm_min = Lm.max() - 20
   ...:

In [9]: # plot sourcemap
   ...: plt.figure()
   ...: plt.title(f'Beamforming Map (f={data_sample["f"][0]} Hz)')
   ...: plt.imshow(Lm, vmax=Lm_max, vmin=Lm_min, extent=extent, origin='lower')
   ...: plt.colorbar(label='Sound Pressure Level (dB)')
   ...: # plot source locations
   ...: for loc in data_sample['loc'].T:
   ...:     plt.scatter(loc[0], loc[1])
   ...: plt.xlabel('x (m)')
   ...: plt.ylabel('y (m)')
   ...:
Out[9]: Text(0, 0.5, 'y (m)')
A more in-depth example on how to generate the data, and how to create a TensorFlow-ready pipeline that produces data on the fly can be found in the Model training with training data generated on the fly example.